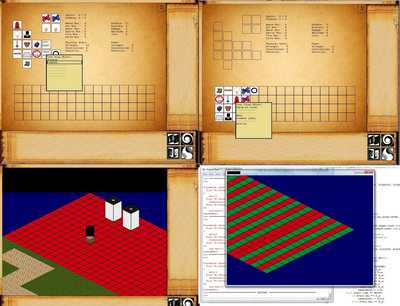
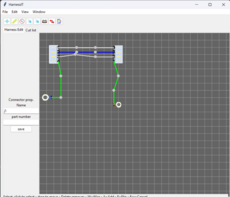
(early) Isometric RPG
Early stages isometric RPG.

Tyler Anderson
(tylerjna)
Movement, containers, inventory.
Controls:
qwe
asd
z c
Click to interact with containers. Arrow keys to control the debug camera---this will break click detection.
EDIT: Image rescaled for uploading purposes.
Changes
Links
Releases
(early) Isometric RPG .2 — 24 Sep, 2012
Pygame.org account Comments
-
WoofWoofDude 2012-09-26 03:09
Nice job, it's look great and your GUI is prety :)
-
programmer 2012-10-09 19:19
I don't know what use this compiled file offers. It might be interesting to look at the code, but just running this doesn't do anything useful.
TylerJNA 2012-10-13 07:01
http://codepad.org/rDBxiJNH
The main project file. It's not very exciting.Ross Tripi 2014-10-24 02:08
Where can I find the mobs module that is a dependency for your code?
TylerJNA 2012-10-13 06:56
I really only put the project up because I noticed most of the isometric projects here are limited to a single game 'screen' (e.g., 'Isomyr'). The file is compiled because: (a) there are few outdated dependencies that I know most people wouldn't want to bother getting and (b) I don't want to release the source until I decide I'm finished. If someone wanted to know how I implemented any particular thing, I'd be happy to explain---but I'm a very novice python scripter, so I doubt anything I did would be hard to figure out.
programmer 2012-10-14 17:23
I have a RPG project on a permanent hiatus because I got migraine from the graphics code. This project interests me, because your engine renders stuff pretty much the way I would have wanted mine to do. I tried a couple isometric rendering engines, but perhaps I just don't have the patience for coding graphics engines, GUIs, and all that jazz. I'll wait and see what kind of a result you come up with, if you ever get this one smoothed out.
TylerJNA 2012-10-15 09:17
http://codepad.org/rDBxiJNH contains all the rendering information (note that currently there are only two rendering layers (the floor, then the walls, with anything mobile drawn while drawing walls), but it could very easily be expanded to an arbitrary number of layers. The only thing to remember is to change when you render anything with a variable position. (Also note that I used tilesets for my walls, but that could be easily changed to use predrawn buildings with some placeholder tiles and a little ingenuity).
(The three rendering loops I have could be combined into one with not too much effort, but this developed very organically.)
---------------------------------------------------------------------------------------------------------------------------------------
def readMap(filename):
assert os.path.exists(filename), 'Cannot find maps.'
mapFile = open(filename, 'r')
contents = mapFile.readlines() + ['\r\n'] #Each map ends in a blank line
mapFile.close()
mapLines = []
mapGrid = []for lineNum in range(len(contents)):
line = contents[lineNum].rstrip('\r\n')
if ';' in line:
line = line[:line.find(';')]
if line != '':
mapLines.append(line)
elif line == '' and len(mapLines) > 0: #Finds the first blank line after a given map.
maxXCoord = -1
for i in range(len(mapLines)):
if len(mapLines[i]) > maxXCoord:
maxXCoord = len(mapLines[i]) #Finds the longest row
for i in range(len(mapLines)):
mapLines[i] += ' ' * (maxXCoord - len(mapLines[i])) #Ensures each mapgrid is rectangular
for i in range(len(mapLines[0])): #range(len(mapLines[0])):
mapGrid.append([]) #Append a sublist representing the y axis for every x coordinate possible
for y in range(len(mapLines)):
for x in range(maxXCoord):
mapGrid[x].append(mapLines[y][x])
return mapGrid #Now every character of the textfile is in a rectangular 2D array.def drawMapGrid(mapGrid, playerx, playery):
mapSurfW = (len(mapGrid) + len(mapGrid[0])) * (TILEW/2) #Draw an appropriately sized surface for rendering.
mapSurfH = (len(mapGrid) + len(mapGrid[0])) * (TILEH/2)
mapSurf = pygame.Surface((mapSurfW, mapSurfH))
mapSurf.fill(BGCOLOR)
xfrom = getRearRange(player.x) #No need to render the entire map, only what the player can see. Determines whether the full drawrange of tiles even exists behind the player, to avoid array errors.
yfrom = getRearRange(player.y)for x in range(playerx - xfrom, playerx + DRAWRANGE): #No need to render the entire map, only what the player can see.
for y in range(playery - yfrom, playery + DRAWRANGE): #Note: the X axis is diagonally right, the y axis diagonally left. http://i.imgur.com/InkbJ.png
left = 32*x + (-32 * (y + 1)) + len(mapGrid[0]) * 32 #The tile 0,0 is always in the top middle of the mapsurface; the rest are all placed relative to this position.
top = 16*x + 16*y #The formula for the y coordinate is a bit easier.
gridRect = pygame.Rect((left, top), (TILEW, TILEH)) #Make a rectangle for the tile about to be drawn.
try:
mapGrid[x][y] in TILEMAP # -IF- the character that was originally in the map text file exists, it will be compared to a dictionary of images.
tile = TILEMAP[mapGrid[x][y]] #Assign the image.
mapSurf.blit(tile, gridRect) #Blit the image onto the rendering surface.
except: pass #If it doesn't exist, there will be a black space there. Useful for no-effort empty areas (e.g., much of the map in interiors)
return mapSurfdef getRearRange(playercoord):
for i in range(DRAWRANGE, 0, -1):
if (playercoord - i) >= 0: return i
return 0def drawMoblist(moblist, mapSurf, mapGrid, x, y, mob): #This is referenced in drawWalls so that the draw order is correct.
left = 0
top = 0
#Make the same adjustments as for drawing the tiles correctly, except with a small change so that NPCs and the character is a bit toward the center of a tile rather than the bottom. Just looks better.
mob.rect.midbottom = (32*mob.x + (-32 * (mob.y + 1)) + len(mapGrid[0]) * 32 + 32, 16*mob.x + 16*mob.y + 24)mapSurf.blit(mob.image, mob.rect)
returndef drawWalls(mapWall, mapGrid, mapSurf, moblist):
xfrom = getRearRange(player.x)
yfrom = getRearRange(player.y)
for x in range(player.x - xfrom, player.x + DRAWRANGE):
for y in range(player.y - yfrom, player.y + DRAWRANGE):
left = 32*x + (-32 * (y + 1)) + len(mapGrid[0]) * 32 #Same loop as before.
top = 16*x + 16*y
wallRect = pygame.Rect((left, top), (32, 163))
wallRect.midbottom = (32*x + (-32 * (y + 1)) + len(mapGrid[0]) * 32 + 32, 16*x + 16*y + 40)
try:
mapWall[x][y] in WALLMAP #Same as before.
wall = WALLMAP[mapWall[x][y]]
mapSurf.blit(wall, wallRect)
except: pass
for mob in moblist: #If a wall isn't in this square, see if a mob is.
if x == mob.x and y == mob.y:
drawMoblist(moblist, mapSurf, mapGrid, x, y, mob)
return mapSurf
---------------------------------------------------------------------------------------------------------------------------------------Now that the mapSurf (drawing surface) has everything we want on it, we blit it to the display:
DISPLAYSURF.fill(BLACK)
mapSurfRect = mapSurf.get_rect()mapSurfRect.top = displayRect.top + cameraY
mapSurfRect.left = displayRect.left + cameraX - len(mapGrid[0])*32
###
The cameraX,Y variables adjust where mapSurf is blitted to, which is pretty important. These depend on the player's position:
cameraX = HALFW - (player.x * 32) + (player.y * 32) - 65 # We want the player to be in the middle of the screen.
cameraY = HALFH - (16 * player.x) - (16 * player.y) - 65
####DISPLAYSURF.blit(mapSurf, mapSurfRect) #Finally, blit the completed surface.
The one major challenge left is determining where the player's mouse/clicks are in relation to all these different coordinate systems. It's not pretty:
TranslatedMouseX, TranslatedMouseY = (event.pos[0]+32*player.x + (-32 * (player.y + 1)) + len(mapGrid[0]) * 32 + 32 - 500 + 16,
event.pos[1] + 16*player.x + 16*player.y + 24 - 400 - 10)Could be better, could be worse. At least it's fast enough. There's obviously a lot of work left to be done on this part of the program, but I'm trying to implement as many of the features I want as possible before polishing one of them for weeks on end.
TylerJNA 2012-10-15 09:18
These comments don't handle code very well.
programmer 2012-10-15 17:09
I think I bumped on a technique about that last major challenge you described. I couldn't find the exact article anymore, but here was a small description of the idea: http://gamedev.stackexchange.c...


Recent Releases
 AS Arrow - v 0.1.4
28 Jan, 2026
AS Arrow - v 0.1.4
28 Jan, 2026
 koxinga - v0.3.3
27 Jan, 2026
koxinga - v0.3.3
27 Jan, 2026
 PyDPainter - Release 2.2.1
21 Jan, 2026
PyDPainter - Release 2.2.1
21 Jan, 2026
 Trosnoth - 1.23.0
18 Jan, 2026
Trosnoth - 1.23.0
18 Jan, 2026
 Royal Ordains - 0.2.4
5 Jan, 2026
Royal Ordains - 0.2.4
5 Jan, 2026
 Divide & Conquer - 1.0
21 Dec, 2025
Divide & Conquer - 1.0
21 Dec, 2025
 HarnessIT - 0.1
11 Dec, 2025
HarnessIT - 0.1
11 Dec, 2025
 Imperial Ambitions - Three Kingdoms - Beta 1.2
6 Dec, 2025
Imperial Ambitions - Three Kingdoms - Beta 1.2
6 Dec, 2025
 SUPER JUMP DUDE - 0.6.1
11 Oct, 2025
SUPER JUMP DUDE - 0.6.1
11 Oct, 2025
 Alice in Pythonland - 1.0
ALL the tags!