
Camera Module Introduction
- Author
by Nirav Patel
- Contact
Pygame 1.9 comes with support for interfacing cameras, allowing you to capture
still images, watch live streams, and do some simple computer vision. This
tutorial will cover all of those use cases, providing code samples you can base
your app or game on. You can refer to the reference documentation
for the full API.
Note
As of Pygame 1.9, the camera module offers native support for cameras that use v4l2 on Linux. There is support for other platforms via Videocapture or OpenCV, but this guide will focus on the native module. Most of the code will be valid for other platforms, but certain things like controls will not work. The module is also marked as EXPERIMENTAL, meaning the API could change in subsequent versions.
Import and Init
import pygame
import pygame.camera
from pygame.locals import *

pygame.init()
pygame.camera.init()
As the camera module is optional, it needs to be imported and initialized manually as shown above.
Capturing a Single Image
Now we will go over the simplest case of opening a camera and capturing a frame as a surface. In the below example, we assume that there is a camera at /dev/video0 on the computer, and initialize it with a size of 640 by 480. The surface called image is whatever the camera was seeing when get_image() was called.
cam = pygame.camera.Camera("/dev/video0",(640,480))
cam.start()
image = cam.get_image()
Listing Connected Cameras
You may be wondering, what if we don't know the exact path of the camera? We can ask the module to provide a list of cameras attached to the computer and initialize the first camera in the list.
camlist = pygame.camera.list_cameras()
if camlist:
    cam = pygame.camera.Camera(camlist[0],(640,480))
Using Camera Controls
Most cameras support controls like flipping the image and changing brightness. set_controls() and get_controls() can be used at any point after using start().
cam.set_controls(hflip = True, vflip = False)
print camera.get_controls()
Capturing a Live Stream
The rest of this tutorial will be based around capturing a live stream of images. For this, we will be using the class below. As described, it will simply blit a constant stream of camera frames to the screen, effectively showing live video. It is basically what you would expect, looping get_image(), blitting to the display surface, and flipping it. For performance reasons, we will be supplying the camera with the same surface to use each time.
class Capture:
    def __init__(self):
        self.size = (640,480)
        # create a display surface. standard pygame stuff
        self.display = pygame.display.set_mode(self.size, 0)

        # this is the same as what we saw before
        self.clist = pygame.camera.list_cameras()
        if not self.clist:
            raise ValueError("Sorry, no cameras detected.")
        self.cam = pygame.camera.Camera(self.clist[0], self.size)
        self.cam.start()

        # create a surface to capture to.  for performance purposes
        # bit depth is the same as that of the display surface.
        self.snapshot = pygame.surface.Surface(self.size, 0, self.display)

    def get_and_flip(self):
        # if you don't want to tie the framerate to the camera, you can check
        # if the camera has an image ready.  note that while this works
        # on most cameras, some will never return true.
        if self.cam.query_image():
            self.snapshot = self.cam.get_image(self.snapshot)

        # blit it to the display surface.  simple!
        self.display.blit(self.snapshot, (0,0))
        pygame.display.flip()

    def main(self):
        going = True
        while going:
            events = pygame.event.get()
            for e in events:
                if e.type == QUIT or (e.type == KEYDOWN and e.key == K_ESCAPE):
                    # close the camera safely
                    self.cam.stop()
                    going = False

            self.get_and_flip()
Since get_image() is a blocking call that could take quite a bit of time on a slow camera, this example uses query_image() to see if the camera is ready. This allows you to separate the framerate of your game from that of your camera. It is also possible to have the camera capturing images in a separate thread, for approximately the same performance gain, if you find that your camera does not support the query_image() function correctly.
Basic Computer Vision
By using the camera, transform, and mask modules, pygame can do some basic computer vision.
Colorspaces
When initializing a camera, colorspace is an optional parameter, with 'RGB', 'YUV', and 'HSV' as the possible choices. YUV and HSV are both generally more useful for computer vision than RGB, and allow you to more easily threshold by color, something we will look at later in the tutorial.
self.cam = pygame.camera.Camera(self.clist[0], self.size, "RGB")
self.cam = pygame.camera.Camera(self.clist[0], self.size, "YUV")
self.cam = pygame.camera.Camera(self.clist[0], self.size, "HSV")
Thresholding
Using the threshold() function from the transform module, one can do simple
green screen like effects, or isolate specifically colored objects in a scene.
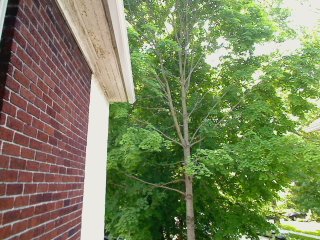
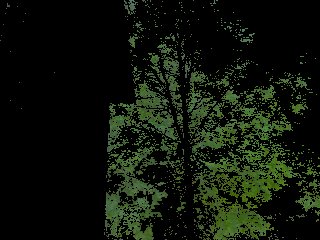
In the below example, we threshold out just the green tree and make the rest
of the image black. Check the reference documentation for details on the
threshold function.
self.thresholded = pygame.surface.Surface(self.size, 0, self.display)
self.snapshot = self.cam.get_image(self.snapshot)
pygame.transform.threshold(self.thresholded,self.snapshot,(0,255,0),(90,170,170),(0,0,0),2)
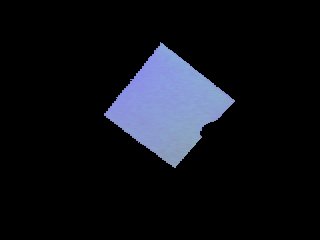
Of course, this is only useful if you already know the exact color of the object you are looking for. To get around this and make thresholding usable in the real world, we need to add a calibration stage where we identify the color of an object and use it to threshold against. We will be using the average_color() function of the transform module to do this. Below is an example calibration function that you could loop until an event like a key press, and an image of what it would look like. The color inside the box will be the one that is used for the threshold. Note that we are using the HSV colorspace in the below images.
def calibrate(self):
    # capture the image
    self.snapshot = self.cam.get_image(self.snapshot)
    # blit it to the display surface
    self.display.blit(self.snapshot, (0,0))
    # make a rect in the middle of the screen
    crect = pygame.draw.rect(self.display, (255,0,0), (145,105,30,30), 4)
    # get the average color of the area inside the rect
    self.ccolor = pygame.transform.average_color(self.snapshot, crect)
    # fill the upper left corner with that color
    self.display.fill(self.ccolor, (0,0,50,50))
    pygame.display.flip()
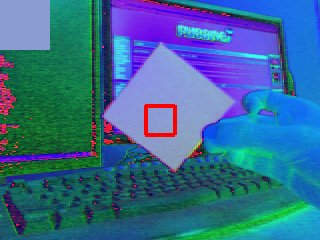
pygame.transform.threshold(self.thresholded,self.snapshot,self.ccolor,(30,30,30),(0,0,0),2)
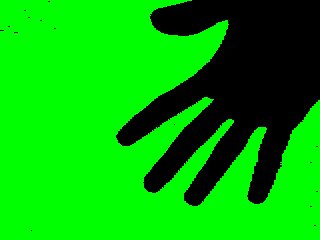
You can use the same idea to do a simple green screen/blue screen, by first getting a background image and then thresholding against it. The below example just has the camera pointed at a blank white wall in HSV colorspace.
def calibrate(self):
    # capture a bunch of background images
    bg = []
    for i in range(0,5):
      bg.append(self.cam.get_image(self.background))
    # average them down to one to get rid of some noise
    pygame.transform.average_surfaces(bg,self.background)
    # blit it to the display surface
    self.display.blit(self.background, (0,0))
    pygame.display.flip()

pygame.transform.threshold(self.thresholded,self.snapshot,(0,255,0),(30,30,30),(0,0,0),1,self.background)
Using the Mask Module
The stuff above is great if you just want to display images, but with the
mask module, you can also use a camera as an
input device for a game. For example, going back to the example of
thresholding out a specific object, we can find the position of that object and
use it to control an on screen object.
def get_and_flip(self):
    self.snapshot = self.cam.get_image(self.snapshot)
    # threshold against the color we got before
    mask = pygame.mask.from_threshold(self.snapshot, self.ccolor, (30, 30, 30))
    self.display.blit(self.snapshot,(0,0))
    # keep only the largest blob of that color
    connected = mask.connected_component()
    # make sure the blob is big enough that it isn't just noise
    if mask.count() > 100:
        # find the center of the blob
        coord = mask.centroid()
        # draw a circle with size variable on the size of the blob
        pygame.draw.circle(self.display, (0,255,0), coord, max(min(50,mask.count()/400),5))
    pygame.display.flip()
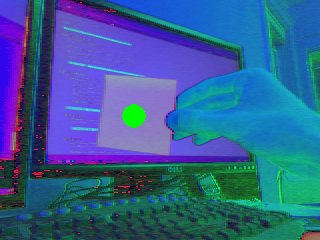
This is just the most basic example. You can track multiple different colored blobs, find the outlines of objects, have collision detection between real life and in game objects, get the angle of an object to allow for even finer control, and more. Have fun!
Edit on GitHub